Jekyll2023-08-18T18:17:14+00:00http://srirupa19.github.io/feed.xmlSrirupa’s BlogI will be uploading Season of KDE blogposts here and other random stuff.Srirupa DattaUnleashing the new Bundle Editor2023-08-17T20:30:36+00:002023-08-17T20:30:36+00:00http://srirupa19.github.io/gsoc/2023/08/17/fifth_post<h1 id="introducing-the-bundle-editor">Introducing the Bundle Editor</h1>
<p>The Bundle Editor is an extension of the Bundle Creator, designed to enable artists to modify existing bundles. Often, when downloading a bundle, we find ourselves drawn to specific brushes and realize that a portion—ranging from 10% to 50%—will likely go unused. In such instances, the ability to trim down bundle sizes by removing unnecessary brushes offers the potential to significantly save on disk space.</p>
<p>Moreover, this functionality extends beyond bundles located solely within the resource folder <code class="language-plaintext highlighter-rouge">usr/local/krita</code>. It grants users the freedom to edit bundles from any preferred location. What’s even more impressive is that these edited bundles won’t be permanently added to the database, thus conserving space. They are temporarily integrated into the database solely for the editing process. Upon restarting Krita, the edited bundles are automatically removed from the database. In order to use the edited bundle, users need to import it just like they would do in case of a normal bundle.</p>
<h2 id="how-to-edit-bundles">How to edit bundles</h2>
<p>To edit bundles, follow these steps:</p>
<ul>
<li>Navigate to <code class="language-plaintext highlighter-rouge">Settings > Manage Resource Libraries... > Edit Bundle</code>.</li>
<li>Choose the desired bundle from your preferred location. The Bundle Creator will open in Editing Mode, displaying the resource items of the selected bundle in the Bundle Editor.</li>
<li>Customize your bundle by adding or removing resource items based on your preferences.</li>
<li>Proceed to the next section to manage tags. You can effortlessly add or remove tags to organize your bundle content.</li>
<li>Modify bundle metadata according to your preferences. Note that altering the bundle name won’t overwrite the original bundle; instead, a new copy with the new name will be created. If you intend to overwrite the existing bundle, avoid changing its name.</li>
<li>By default, the Bundle Editor saves the edited bundle in its original location, effectively overwriting it (unless you alter the name). Alternatively, if you opt to save the edited bundle in a new location, the original bundle remains unaffected, and the edited version is stored separately.</li>
<li>Be mindful that the Bundle Editor issues a warning if you choose to overwrite the original bundle, as this action could result in data loss. This safeguard prevents accidental overwriting of downloaded bundles.</li>
</ul>
<p>The bundle editing workflow has been demonstrated below.</p>
<p><img src="/assets/bundle_editor.gif" alt="Bundle Creator" /></p>
<hr />
<p>Again, a drawing on paper because I was too busy to draw something in Krita. :(</p>
<p><img src="/assets/eye.jpeg" alt="Bundle Creator" /></p>Srirupa DattaIntroducing the Bundle EditorLong Post Alert!!2023-07-07T20:30:36+00:002023-07-07T20:30:36+00:00http://srirupa19.github.io/gsoc/2023/07/07/fourth_post<!--  -->
<p><img src="/assets/MidTerm.gif" alt="Bundle Creator" /></p>
<h1 id="caution-technical-jargon-zone">Caution: Technical Jargon Zone!</h1>
<p>If you had been following my earlier blog posts, you would know that I rarely include any code in them. My focus has primarily been on explaining how things work rather than delving into the specifics of how I implemented them. But this time I will be taking a deeper dive into the code, so in case you want to skip code today, you better not start reading this. ;)</p>
<p>This blog post has been a bit of a learning exercise for me as I pushed myself to learn UML diagrams and study a few design patterns in Qt. Learning Qt itself has been a challenge, though I doubt I can barely say that I have learnt it - I think it’s safe to say that I have just got more comfortable not understanding most things in Qt and trying to understand the parts that concern me. Now that I’m a teeny tiny bit wiser, I feel learning Object-Oriented Programming with C++, and a few design patterns prior to learning Qt would have been a better idea. Things (read classes) make a lot more sense once you understand the core design patterns.</p>
<h2 id="bundle-creator-wizard">Bundle Creator Wizard</h2>
<p>The plan was to split the bundle creator into four main components, each having a single responsibility (<b>Single Responsibility Principle</b>!). <code class="language-plaintext highlighter-rouge">DlgCreateBundle</code> is the main class for the Bundle Creator. Notice how it has all functions related to putting the resources, tags and metadata in the bundle.</p>
<p>Similarly, all the code regarding resource choosing is present in <code class="language-plaintext highlighter-rouge">PageResourceChooser</code>(well not all, some of it in <code class="language-plaintext highlighter-rouge">WdgResourcePreview</code>), <code class="language-plaintext highlighter-rouge">PageTagChooser</code>(and <code class="language-plaintext highlighter-rouge">WdgTagPreview</code>) deals with the bundle’s tags, and all the metadata logic is present in <code class="language-plaintext highlighter-rouge">PageMetaDataInfo</code>. These wizard pages are completely independent of each other. There is, however, a message passing between <code class="language-plaintext highlighter-rouge">PageBundleSaver</code> and the other wizard pages which I will discuss later.</p>
<p><img src="https://i.postimg.cc/zv4H3hSq/Bundle-Creator-drawio-4.png" alt="" /></p>
<h2 id="resource-item-viewer">Resource Item Viewer</h2>
<p>The Bundle Creator’s Resource Item Viewer now shares the same user interface as the one used by the Resource Manager in Krita. However, in order to not upset existing users of Krita, a new View Mode Button has been added so that users can switch between grid view and list view as per their preference.</p>
<p>The <code class="language-plaintext highlighter-rouge">WdgResourcePreview</code> class only deals with the left half of the Bundle Creator and the Resource Manager. That said, it loads the resources from the Resource Database onto the viewer, and displays resources as filtered by text or tag. However, all the code related to what happens when a resource item is clicked is dealt within the <code class="language-plaintext highlighter-rouge">PageResourceChooser</code> class for the Bundle Creator and the <code class="language-plaintext highlighter-rouge">DlgResourceManager</code> for the Resource Manager.</p>
<p>To manipulate the working of the right half of the Resource Chooser Page, one would need to make modifications to <code class="language-plaintext highlighter-rouge">PageResourceChooser</code>. And even though the left and right halves of the Resource Chooser page look fairly identical, it is important to note that the left half is built upon a <code class="language-plaintext highlighter-rouge">QListView</code> (<code class="language-plaintext highlighter-rouge">KisResourceItemListView</code>) and the right one on a <code class="language-plaintext highlighter-rouge">QListWidget</code> (<code class="language-plaintext highlighter-rouge">KisResourceItemListWidget</code>). This is because the left half loads the data directly from the Resource Database, using <code class="language-plaintext highlighter-rouge">KisResourceModel</code>. And the right half provides a view of the resource items selected by the user. It does use <code class="language-plaintext highlighter-rouge">KisResourceModel</code> for fetching the icon and name of the relevant item, but it doesn’t use the model directly.</p>
<p><img src="https://i.postimg.cc/K8n8rnwV/Resource-Page-drawio.png" alt="" /></p>
<p>This is really how each class mentioned above looks like.</p>
<!--  -->
<p><img src="/assets/Common_UI.png" alt="Common UI" /></p>
<h2 id="qts-model-view-architecture-in-bundle-creator">Qt’s Model View Architecture in Bundle Creator</h2>
<p>Similarly to MVC, Qt’s Model/view design pattern is essentially separated into three components: <b>Model</b>, <b>View</b> and <b>Delegate</b>.</p>
<p>Instead of utilizing controller classes, Qt’s view handles data updating through delegates. It serves two primary objectives: firstly, aiding the view in rendering each value, and secondly, facilitating user-initiated changes. As a result, the controller’s responsibilities have merged with the view, as the view now assumes some of the tasks traditionally assigned to the controller through Qt’s delegate mechanism.</p>
<p><img src="https://i.postimg.cc/t46NQNVd/mvc-drawio.png" alt="" /></p>
<p>The <code class="language-plaintext highlighter-rouge">KisResourceModel</code>, <code class="language-plaintext highlighter-rouge">KisTagModel</code>, <code class="language-plaintext highlighter-rouge">KisStorageModel</code> act as the models for the <code class="language-plaintext highlighter-rouge">QComboBox</code>-es in the Bundle Creator(and Resource Manager). The <code class="language-plaintext highlighter-rouge">KisTagFilterResourceProxyModel</code> is built on top of the <code class="language-plaintext highlighter-rouge">KisResourceModel</code> and <code class="language-plaintext highlighter-rouge">KisTagModel</code>, and serves as a model for the <code class="language-plaintext highlighter-rouge">KisResourceItemView</code> which displays the list of available resources. And the <code class="language-plaintext highlighter-rouge">KisResourceItemDelegate</code> renders the items of data. When an item is edited, the delegate communicates with the model directly using model indexes.</p>
<table>
<thead>
<tr>
<th>Model</th>
<th>View</th>
</tr>
</thead>
<tbody>
<tr>
<td>KisResourceModel</td>
<td>QComboBox</td>
</tr>
<tr>
<td>KisTagModel</td>
<td>QComboBox</td>
</tr>
<tr>
<td>KisStorageModel</td>
<td>QComboBox</td>
</tr>
<tr>
<td>KisTagFilterResourceProxyModel</td>
<td>KisResourceItemView</td>
</tr>
</tbody>
</table>
<p><img src="https://i.postimg.cc/GpbmQbP0/test1-drawio-1.png" alt="" /></p>
<h2 id="signal-slot-mechanism-in-bundle-creator">Signal Slot Mechanism in Bundle Creator</h2>
<p>Very classic, but just a rough sketch showing how the wizard pages communicate with one another. This connection helps to update the summary in <code class="language-plaintext highlighter-rouge">PageBundleSaver</code> whenever the selected list of resources or tags changes.</p>
<p><img src="https://i.postimg.cc/zvt4ywcy/Signal-Slot-drawio.png" alt="" /></p>
<h2 id="a-bit-about-the-tag-chooser">A bit about the Tag Chooser</h2>
<p><img src="https://i.postimg.cc/44Ynbpt5/finaltags.png" alt="" /></p>
<p>This is something I have been working on last week. The Tag Chooser page is updated to look similar to the Resource Manager’s tag section. The available tags are displayed using <code class="language-plaintext highlighter-rouge">KisTagLabel</code> and the selected ones are displayed(and selected) using <code class="language-plaintext highlighter-rouge">KisTagSelectionWidget</code>. In both the cases, the <code class="language-plaintext highlighter-rouge">KisTagModel</code> serves as the underlying model.</p>
<h3 id="merge-request">Merge Request</h3>
<p>My merge request can be viewed <a href="https://invent.kde.org/graphics/krita/-/merge_requests/1802">here</a>.</p>
<h3 id="important-commits">Important Commits</h3>
<ul>
<li><a href="https://invent.kde.org/graphics/krita/-/merge_requests/1802/diffs?commit_id=2321de6a24a6013b090faf0e7f46fd442c8a2901">Improve Bundle Creator in Krita</a></li>
<li><a href="https://invent.kde.org/graphics/krita/-/merge_requests/1802/diffs?commit_id=04d40bc22fd5ecc897ba87108ed135370c3e7298">Implement Resource Chooser page</a></li>
<li><a href="https://invent.kde.org/graphics/krita/-/merge_requests/1802/diffs?commit_id=94c54d1806e035c076cfb6b92c3b9de3a9d69037">Add common UI to Resource Manager</a></li>
<li><a href="https://invent.kde.org/graphics/krita/-/merge_requests/1802/diffs?commit_id=e0cd7e47e3c7a75f2b95cee694e387da1ce9c707">Implement metadata and saver pages</a></li>
<li><a href="https://invent.kde.org/graphics/krita/-/merge_requests/1802/diffs?commit_id=3cb54b26df4a290fc8961f7415139cb2274839b4">Add toolbutton to switch views</a></li>
<li><a href="https://invent.kde.org/graphics/krita/-/merge_requests/1802/diffs?commit_id=b950caf321f7ea50fae9576f553ee686aa438f6c">Add ToolButton for Selected Table</a></li>
<li><a href="https://invent.kde.org/graphics/krita/-/merge_requests/1802/diffs?commit_id=0553ff71046e8136241d03a17eb4dfcd637e9472">Apply background to icons</a></li>
<li><a href="https://invent.kde.org/graphics/krita/-/merge_requests/1802/diffs?commit_id=f672e61b865ed96b6dfa804449dc7829630d78ec">Make icons smaller</a></li>
<li><a href="https://invent.kde.org/graphics/krita/-/merge_requests/1802/diffs?commit_id=443121afd18b366c96454b3f2098e8e5bf7fd2ec">Add Summary</a></li>
<li><a href="https://invent.kde.org/graphics/krita/-/merge_requests/1802/diffs?commit_id=7bdf10e36639aa5ceec4103487f214fb1d213134">Add tags to summary</a></li>
<li><a href="https://invent.kde.org/graphics/krita/-/merge_requests/1802/diffs?commit_id=0d3a34baf12df9a129de3823cf456e7959e4aed5">Highlight side widget</a></li>
<li><a href="https://invent.kde.org/graphics/krita/-/merge_requests/1802/diffs?commit_id=90c8e2f6b8bc08a41c392a6c10f2fdd400779e39">Add enum for clarity</a></li>
<li><a href="https://invent.kde.org/graphics/krita/-/merge_requests/1802/diffs?commit_id=bacde075314042be235284c28270d4b9f5cacde5">Add enum in resource item viewer</a></li>
<li><a href="https://invent.kde.org/graphics/krita/-/merge_requests/1802/diffs?commit_id=6b257ec14c6cfec87cf0df1f947a09463c557047">Improve Tag Chooser</a>
<!-- - [Resolve merge conflicts, add edit bundle button](https://invent.kde.org/graphics/krita/-/merge_requests/1802/diffs?commit_id=24813e070a4e965521e3e6fb91ac5440b3c77cc4), [Resolve conflicts](https://invent.kde.org/graphics/krita/-/merge_requests/1802/diffs?commit_id=dc4612ae8909629bc8b2f045eafa87b56e1acf24) --></li>
</ul>
<h2 id="plans-post-mid-term-evaluation">Plans post Mid-Term Evaluation</h2>
<p>Post midterm, I would be working on adding the feature of editing bundles in Krita, which will allow artists to add and delete components from existing bundles, so that they won’t have to go through the process of creating a bundle from scratch whenever they want to make some changes. I’ve created a <a href="https://krita-artists.org/t/bundle-editor-new-feature/69635">post</a> on Krita Artists Forum to better understand the preferences of artists regarding bundle editing. Feel free to drop a comment if you want to talk about it! :D</p>
<hr />
<p>This time a drawing on paper art since I have exhausted my collection of art I made using Krita - serves as a reminder that I should do this more often. :)</p>
<p><img src="/assets/handDrawn.jpeg" alt="Hand Drawn" /></p>Srirupa DattaCaution: Technical Jargon Zone! If you had been following my earlier blog posts, you would know that I rarely include any code in them. My focus has primarily been on explaining how things work rather than delving into the specifics of how I implemented them. But this time I will be taking a deeper dive into the code, so in case you want to skip code today, you better not start reading this. ;) This blog post has been a bit of a learning exercise for me as I pushed myself to learn UML diagrams and study a few design patterns in Qt. Learning Qt itself has been a challenge, though I doubt I can barely say that I have learnt it - I think it’s safe to say that I have just got more comfortable not understanding most things in Qt and trying to understand the parts that concern me. Now that I’m a teeny tiny bit wiser, I feel learning Object-Oriented Programming with C++, and a few design patterns prior to learning Qt would have been a better idea. Things (read classes) make a lot more sense once you understand the core design patterns. Bundle Creator Wizard The plan was to split the bundle creator into four main components, each having a single responsibility (Single Responsibility Principle!). DlgCreateBundle is the main class for the Bundle Creator. Notice how it has all functions related to putting the resources, tags and metadata in the bundle. Similarly, all the code regarding resource choosing is present in PageResourceChooser(well not all, some of it in WdgResourcePreview), PageTagChooser(and WdgTagPreview) deals with the bundle’s tags, and all the metadata logic is present in PageMetaDataInfo. These wizard pages are completely independent of each other. There is, however, a message passing between PageBundleSaver and the other wizard pages which I will discuss later. Resource Item Viewer The Bundle Creator’s Resource Item Viewer now shares the same user interface as the one used by the Resource Manager in Krita. However, in order to not upset existing users of Krita, a new View Mode Button has been added so that users can switch between grid view and list view as per their preference. The WdgResourcePreview class only deals with the left half of the Bundle Creator and the Resource Manager. That said, it loads the resources from the Resource Database onto the viewer, and displays resources as filtered by text or tag. However, all the code related to what happens when a resource item is clicked is dealt within the PageResourceChooser class for the Bundle Creator and the DlgResourceManager for the Resource Manager. To manipulate the working of the right half of the Resource Chooser Page, one would need to make modifications to PageResourceChooser. And even though the left and right halves of the Resource Chooser page look fairly identical, it is important to note that the left half is built upon a QListView (KisResourceItemListView) and the right one on a QListWidget (KisResourceItemListWidget). This is because the left half loads the data directly from the Resource Database, using KisResourceModel. And the right half provides a view of the resource items selected by the user. It does use KisResourceModel for fetching the icon and name of the relevant item, but it doesn’t use the model directly. This is really how each class mentioned above looks like. Qt’s Model View Architecture in Bundle Creator Similarly to MVC, Qt’s Model/view design pattern is essentially separated into three components: Model, View and Delegate. Instead of utilizing controller classes, Qt’s view handles data updating through delegates. It serves two primary objectives: firstly, aiding the view in rendering each value, and secondly, facilitating user-initiated changes. As a result, the controller’s responsibilities have merged with the view, as the view now assumes some of the tasks traditionally assigned to the controller through Qt’s delegate mechanism. The KisResourceModel, KisTagModel, KisStorageModel act as the models for the QComboBox-es in the Bundle Creator(and Resource Manager). The KisTagFilterResourceProxyModel is built on top of the KisResourceModel and KisTagModel, and serves as a model for the KisResourceItemView which displays the list of available resources. And the KisResourceItemDelegate renders the items of data. When an item is edited, the delegate communicates with the model directly using model indexes. Model View KisResourceModel QComboBox KisTagModel QComboBox KisStorageModel QComboBox KisTagFilterResourceProxyModel KisResourceItemView Signal Slot Mechanism in Bundle Creator Very classic, but just a rough sketch showing how the wizard pages communicate with one another. This connection helps to update the summary in PageBundleSaver whenever the selected list of resources or tags changes. A bit about the Tag Chooser This is something I have been working on last week. The Tag Chooser page is updated to look similar to the Resource Manager’s tag section. The available tags are displayed using KisTagLabel and the selected ones are displayed(and selected) using KisTagSelectionWidget. In both the cases, the KisTagModel serves as the underlying model. Merge Request My merge request can be viewed here. Important Commits Improve Bundle Creator in Krita Implement Resource Chooser page Add common UI to Resource Manager Implement metadata and saver pages Add toolbutton to switch views Add ToolButton for Selected Table Apply background to icons Make icons smaller Add Summary Add tags to summary Highlight side widget Add enum for clarity Add enum in resource item viewer Improve Tag Chooser Plans post Mid-Term Evaluation Post midterm, I would be working on adding the feature of editing bundles in Krita, which will allow artists to add and delete components from existing bundles, so that they won’t have to go through the process of creating a bundle from scratch whenever they want to make some changes. I’ve created a post on Krita Artists Forum to better understand the preferences of artists regarding bundle editing. Feel free to drop a comment if you want to talk about it! :D This time a drawing on paper art since I have exhausted my collection of art I made using Krita - serves as a reminder that I should do this more often. :)The Fully Functional Bundle Creator2023-06-15T20:30:36+00:002023-06-15T20:30:36+00:00http://srirupa19.github.io/gsoc/2023/06/15/third_post<p><img src="/assets/windmill.png" alt="Bundle Creator" /></p>
<hr />
<h2 id="-recap-"><b> Recap </b></h2>
<p>Welcome back! Last time, I successfully completed the development of the Bundle Creator up to the Resource Chooser page. This page now allows us to easily select resource items by applying <b>filters</b> based on tags or names. I’ve introduced some UI improvements, including the ability to <b>click-to-select</b>, the addition of a convenient <code class="language-plaintext highlighter-rouge">Remove Selected</code> button and the introduction of a visually appealing <b>grid view</b> to replace the traditional list view. These enhancements enhance the overall user experience and provide a more streamlined resource selection process.</p>
<h2 id="-the-bundle-creator-wizard-"><b> The Bundle Creator Wizard </b></h2>
<p>As mentioned in previous blog posts, the Bundle Creator consists of four pages: the <code class="language-plaintext highlighter-rouge">Resource Chooser</code>, <code class="language-plaintext highlighter-rouge">Tag Chooser</code>, <code class="language-plaintext highlighter-rouge">Bundle Details</code>, and <code class="language-plaintext highlighter-rouge">Save to</code> pages. These pages can be seen in the wizard’s side widget, and users can navigate between them using the <code class="language-plaintext highlighter-rouge">Next</code> and <code class="language-plaintext highlighter-rouge">Back</code> buttons. The <code class="language-plaintext highlighter-rouge">Tag Chooser</code> page retains a similar design to the Embed Tags page from the previous version of the bundle creator. It offers a familiar interface for users to select and <b>embed tags</b> to their new bundle. Similarly, the Bundle Details page maintains consistency with the previous bundle creator, where one can fill out the <b>bundle name, author, website</b> etc.</p>
<p>The inclusion of the <code class="language-plaintext highlighter-rouge">Save to</code> Page adds a crucial final step to the bundle creation process. It provides a <b>summary</b> of the bundle details, which includes the number of selected resource items per resource type, and the tags chosen for embedding. This comprehensive summary allows users to review and confirm their bundle’s content before finalizing the creation process.</p>
<p>By dividing the bundle creation process into these distinct and user-friendly pages, particularly for beginners, the Bundle Creator offers a streamlined and intuitive experience. Users can efficiently navigate through each step, making informed decisions and customizing their bundles according to their specific needs.</p>
<p><img src="/assets/BundleCreator.gif" alt="Bundle Creator" /></p>
<!-- <img src="https://i.postimg.cc/8PRY8wdg/demo4.png" alt="Demo" style="box-shadow: 5px 5px 5px gray;"> -->
<p>I have added a small <b>tool button</b> that allows switching between grid view and list view in both the resource manager and bundle creator, providing convenience to the users. Additionally, I have made the icons in the bundle creator more consistent.</p>
<p><img src="/assets/View.gif" alt="Bundle Creator" /></p>
<h3 id="merge-request">Merge Request</h3>
<p>My merge request can be viewed <a href="https://invent.kde.org/graphics/krita/-/merge_requests/1802">here</a>.</p>
<h2 id="plans-ahead">Plans ahead</h2>
<p>In the upcoming weeks, I would be working on adding the editing bundles feature, as well as improving the <code class="language-plaintext highlighter-rouge">Choose Tags</code> section. This requires some UI related feedback, and if you’re interested to help out, please feel free to drop a comment on this <a href="https://krita-artists.org/t/bundle-creator-improving-the-ui-ux-design/57405">post</a> I created on Krita Artists Forum!</p>Srirupa DattaRecap Welcome back! Last time, I successfully completed the development of the Bundle Creator up to the Resource Chooser page. This page now allows us to easily select resource items by applying filters based on tags or names. I’ve introduced some UI improvements, including the ability to click-to-select, the addition of a convenient Remove Selected button and the introduction of a visually appealing grid view to replace the traditional list view. These enhancements enhance the overall user experience and provide a more streamlined resource selection process. The Bundle Creator Wizard As mentioned in previous blog posts, the Bundle Creator consists of four pages: the Resource Chooser, Tag Chooser, Bundle Details, and Save to pages. These pages can be seen in the wizard’s side widget, and users can navigate between them using the Next and Back buttons. The Tag Chooser page retains a similar design to the Embed Tags page from the previous version of the bundle creator. It offers a familiar interface for users to select and embed tags to their new bundle. Similarly, the Bundle Details page maintains consistency with the previous bundle creator, where one can fill out the bundle name, author, website etc. The inclusion of the Save to Page adds a crucial final step to the bundle creation process. It provides a summary of the bundle details, which includes the number of selected resource items per resource type, and the tags chosen for embedding. This comprehensive summary allows users to review and confirm their bundle’s content before finalizing the creation process. By dividing the bundle creation process into these distinct and user-friendly pages, particularly for beginners, the Bundle Creator offers a streamlined and intuitive experience. Users can efficiently navigate through each step, making informed decisions and customizing their bundles according to their specific needs. I have added a small tool button that allows switching between grid view and list view in both the resource manager and bundle creator, providing convenience to the users. Additionally, I have made the icons in the bundle creator more consistent. Merge Request My merge request can be viewed here. Plans ahead In the upcoming weeks, I would be working on adding the editing bundles feature, as well as improving the Choose Tags section. This requires some UI related feedback, and if you’re interested to help out, please feel free to drop a comment on this post I created on Krita Artists Forum!Second Blog Post for GsoC’232023-05-25T20:30:36+00:002023-05-25T20:30:36+00:00http://srirupa19.github.io/gsoc/2023/05/25/second_post<h2 id="-overview-"><b> Overview </b></h2>
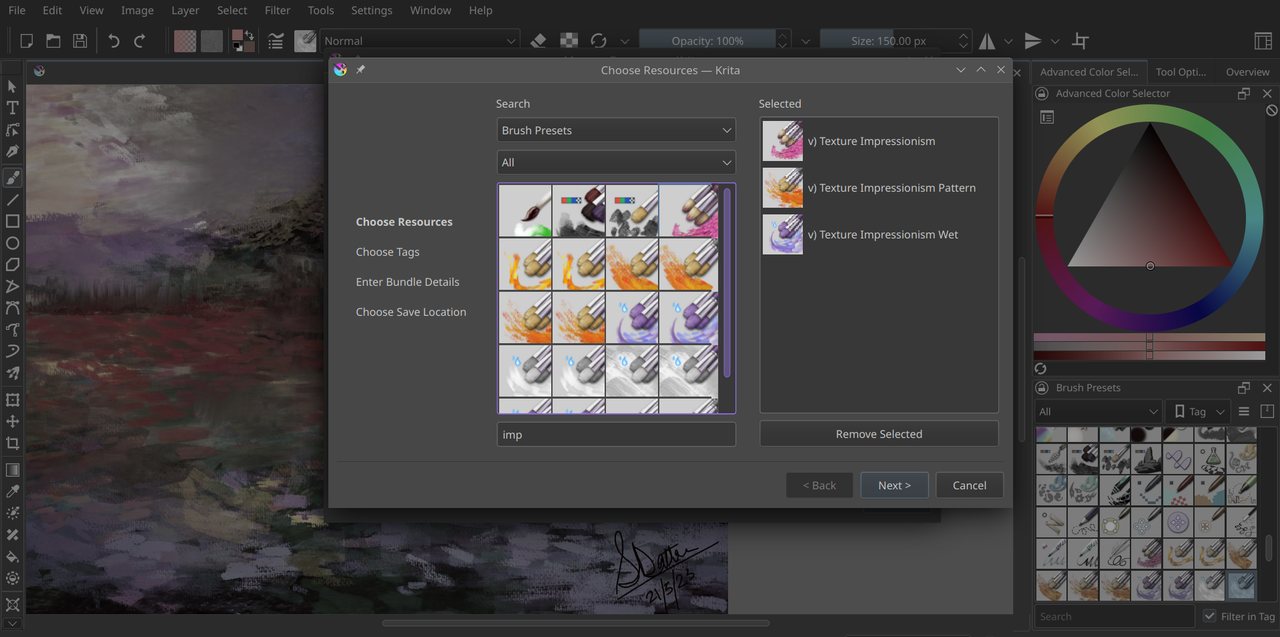
<p>If you’ve been following my previous blog posts, you may recall that I’ve been working on enhancing the user interface of the Bundle Creator in Krita. The new Bundle Creator is to be designed similar to an installation wizard. By compartmentalizing the functionality into four separate sections, users can effortlessly navigate through the various aspects of bundle creation process.</p>
<h2 id="my-progess-so-far">My Progess so far…</h2>
<p>I spent the last two weeks working on the <code class="language-plaintext highlighter-rouge">Resource Chooser</code> section. The <code class="language-plaintext highlighter-rouge">Resource Chooser</code> page allows users to users to handpick the resource items they wish to include in their new bundle. The most notable enhancement is the transition from a traditional list view to a more intuitive <b> grid view </b> for the list of available resources, similar to the Resource Manager layout.</p>
<p>In the previous version, users were required to individually select each resource item and use the <code class="language-plaintext highlighter-rouge">></code> key to add them to the list of selected resources. However, now users can simply click on resource items directly to add them to the selected list. This seamless integration of the grid view and the ability to <b> click-to-select </b> greatly streamlines the workflow, especially benefiting tablet users of Krita.</p>
<p>One can also <b> filter resources by tag or name </b> before choosing resource items to be added to the selected list. This allows users to swiftly select resource items that serve a similar purpose when creating a new bundle. Gone are the days of scrolling through the entire list of available items; now, users can easily narrow down their options through efficient filtering.</p>
<p>And finally, to remove a single resource item, users can now simply select it by clicking on it. Similarly, for removing multiple items, users can hold down the Ctrl key and select multiple items imultaneously.Once the desired resource items are selected, users can easily remove them by clicking on the <b> <code class="language-plaintext highlighter-rouge">Remove Resources</code> button </b>.</p>
<!--  -->
<p><img src="https://i.postimg.cc/8PRY8wdg/demo4.png" alt="Demo" style="box-shadow: 5px 5px 5px gray;" /></p>
<h3 id="merge-request">Merge Request</h3>
<p>You can view my merge request <a href="https://invent.kde.org/graphics/krita/-/merge_requests/1802">here</a>.</p>
<h2 id="plans-ahead">Plans ahead</h2>
<p>In the upcoming weeks, I would be working on the <code class="language-plaintext highlighter-rouge">Choose Tags</code> section. This requires some UI related feedback, and if you’re interested to help out, please feel free to drop a comment on this <a href="https://krita-artists.org/t/bundle-creator-improving-the-ui-ux-design/57405">post</a> I created on Krita Artists Forum!</p>
<hr />
<p><img src="https://i.postimg.cc/CKWMj6My/Impressionism.jpg" alt="My Painting" /></p>
<p>And just to add a splash of colour to my blogpost, this is just a very quick artwork which I made using Ramon’s <a href="https://www.youtube.com/watch?v=_BuZ4-Gu_Kc&t=922s">impressionism brush bundle</a>. It’s super easy to use, do check it out! :D</p>Srirupa DattaOverview If you’ve been following my previous blog posts, you may recall that I’ve been working on enhancing the user interface of the Bundle Creator in Krita. The new Bundle Creator is to be designed similar to an installation wizard. By compartmentalizing the functionality into four separate sections, users can effortlessly navigate through the various aspects of bundle creation process. My Progess so far… I spent the last two weeks working on the Resource Chooser section. The Resource Chooser page allows users to users to handpick the resource items they wish to include in their new bundle. The most notable enhancement is the transition from a traditional list view to a more intuitive grid view for the list of available resources, similar to the Resource Manager layout. In the previous version, users were required to individually select each resource item and use the > key to add them to the list of selected resources. However, now users can simply click on resource items directly to add them to the selected list. This seamless integration of the grid view and the ability to click-to-select greatly streamlines the workflow, especially benefiting tablet users of Krita. One can also filter resources by tag or name before choosing resource items to be added to the selected list. This allows users to swiftly select resource items that serve a similar purpose when creating a new bundle. Gone are the days of scrolling through the entire list of available items; now, users can easily narrow down their options through efficient filtering. And finally, to remove a single resource item, users can now simply select it by clicking on it. Similarly, for removing multiple items, users can hold down the Ctrl key and select multiple items imultaneously.Once the desired resource items are selected, users can easily remove them by clicking on the Remove Resources button . Merge Request You can view my merge request here. Plans ahead In the upcoming weeks, I would be working on the Choose Tags section. This requires some UI related feedback, and if you’re interested to help out, please feel free to drop a comment on this post I created on Krita Artists Forum! And just to add a splash of colour to my blogpost, this is just a very quick artwork which I made using Ramon’s impressionism brush bundle. It’s super easy to use, do check it out! :DFirst Blog Post for GsoC 2023!2023-05-14T20:30:36+00:002023-05-14T20:30:36+00:00http://srirupa19.github.io/gsoc/2023/05/14/first_post<p><img src="https://i.postimg.cc/tCNW0GX5/groot4.jpg" alt="My Painting" /></p>
<p><img src="https://i.postimg.cc/HxkkRFkr/d4d5def6d88745cfb23d71a277770301.png" alt="Text" /></p>
<h2 id="about-me---i-am-groot">About Me - I am Groot.</h2>
<p>I’m Srirupa Datta, about to finish my undergraduate Electrical Engineering degree at Jadavpur University, India, in June. This year, I got selected for Google Summer of Code and will be working on improving the Bundle Creator in Krita.</p>
<h2 id="my-introduction-to-krita">My Introduction to Krita…</h2>
<p>It’s been more than a year since my last blogpost where I posted monthly updates on my progress on adding the Perspective Ellipse assistant tool in Krita during SoK’22. Being a painter who’s interested in software development, I’ve been interested in Krita ever since I started using it.</p>
<h2 id="what-its-all-about">What it’s all about</h2>
<div style="background-color:rgba(0, 0, 0, 0.0470588); padding:10px 10px;">
<p>
The primary format to share resources in Krita is a Resource Bundle, which is a compressed file containing all the resources together. It also contains some other information like metadata and a manifest so Krita can check there’s no errors in the file.
</p>
<p>
Krita’s Bundle Creator allows one to create their own bundle from the resources of their choice. The project that I would be working on, aims to improve the user interface of the current Bundle Creator, and allow the ability to edit bundles (which is currently not supported in Krita).
</p>
</div>
<h4 id="the-new-bundle-creator">The new Bundle Creator</h4>
<p>The new Bundle Creator would look like an installation wizard with four pages which can be navigated using the <code class="language-plaintext highlighter-rouge">Next</code> and <code class="language-plaintext highlighter-rouge">Back</code> buttons, as well as buttons on the left side panel.</p>
<p>I think the primary objective behind designing the new Bundle Creator was to organize its workflow, that is, segregate sections devoted to a particular function or job. This is what led to the idea of using a wizard, instead of simple dialogs. Hence it would have four wizard pages:</p>
<ul>
<li>Choose Resources</li>
<li>Choose Tags</li>
<li>Enter Bundle Details</li>
<li>Choose Save Location</li>
</ul>
<p>Some of the cool features you can expect in the new Bundle Creator are a <b>gridview</b> like that of Resource Manager’s to view all the resources, <b>filter resources</b> by name or tag before selecting, and an option to change back to the default listview from gridview if one wishes to stick to the previous layout.</p>
<p><img src="https://i.postimg.cc/XNGbq9XG/Mod-W1-ss.png" alt="W1" /></p>
<p>Adding <b>custom tags</b> to selected resources is a feature that we wish to integrate, but it would require a redesign of the <code class="language-plaintext highlighter-rouge">Choose Tags</code> wizard page that has been shown below. Just to clarify, these are all mockups!</p>
<p><img src="https://i.postimg.cc/sg3qYWfJ/mod-W2-ss.png" alt="W2" />
<!--  -->
<!--  --></p>
<p>Yet another important feature would be <b>reloading</b> last bundle data when opened/on startup - this is particularly useful when making a bundle for other people.</p>
<p>Apart from these, the new Bundle Creator would be <b>resizable</b>(Yaay!), and a separate Menu entry called Bundle Creator would be created. We plan to move <code class="language-plaintext highlighter-rouge">Manage Resource Libraries</code> , <code class="language-plaintext highlighter-rouge">Manage Resources</code> and <code class="language-plaintext highlighter-rouge">Bundle Creator</code> from <code class="language-plaintext highlighter-rouge">Menu > Settings</code> to <code class="language-plaintext highlighter-rouge">Menu > Resources</code>.</p>
<p>And lastly, I would be working on adding the feature of <b>editing bundles</b> - this however needs to be discussed more and would be dealt with post my mid term evaluations.</p>
<p>And of course, if you want to suggest some ideas or improvements, feel free to drop a comment on this <a href="https://krita-artists.org/t/bundle-creator-improving-the-ui-ux-design/57405">post</a> I created on Krita Artists Forum!</p>Srirupa DattaAbout Me - I am Groot. I’m Srirupa Datta, about to finish my undergraduate Electrical Engineering degree at Jadavpur University, India, in June. This year, I got selected for Google Summer of Code and will be working on improving the Bundle Creator in Krita. My Introduction to Krita… It’s been more than a year since my last blogpost where I posted monthly updates on my progress on adding the Perspective Ellipse assistant tool in Krita during SoK’22. Being a painter who’s interested in software development, I’ve been interested in Krita ever since I started using it. What it’s all about The primary format to share resources in Krita is a Resource Bundle, which is a compressed file containing all the resources together. It also contains some other information like metadata and a manifest so Krita can check there’s no errors in the file. Krita’s Bundle Creator allows one to create their own bundle from the resources of their choice. The project that I would be working on, aims to improve the user interface of the current Bundle Creator, and allow the ability to edit bundles (which is currently not supported in Krita). The new Bundle Creator The new Bundle Creator would look like an installation wizard with four pages which can be navigated using the Next and Back buttons, as well as buttons on the left side panel. I think the primary objective behind designing the new Bundle Creator was to organize its workflow, that is, segregate sections devoted to a particular function or job. This is what led to the idea of using a wizard, instead of simple dialogs. Hence it would have four wizard pages: Choose Resources Choose Tags Enter Bundle Details Choose Save Location Some of the cool features you can expect in the new Bundle Creator are a gridview like that of Resource Manager’s to view all the resources, filter resources by name or tag before selecting, and an option to change back to the default listview from gridview if one wishes to stick to the previous layout. Adding custom tags to selected resources is a feature that we wish to integrate, but it would require a redesign of the Choose Tags wizard page that has been shown below. Just to clarify, these are all mockups! Yet another important feature would be reloading last bundle data when opened/on startup - this is particularly useful when making a bundle for other people. Apart from these, the new Bundle Creator would be resizable(Yaay!), and a separate Menu entry called Bundle Creator would be created. We plan to move Manage Resource Libraries , Manage Resources and Bundle Creator from Menu > Settings to Menu > Resources. And lastly, I would be working on adding the feature of editing bundles - this however needs to be discussed more and would be dealt with post my mid term evaluations. And of course, if you want to suggest some ideas or improvements, feel free to drop a comment on this post I created on Krita Artists Forum!Digging Deeper into the Math: SoK’22 #42022-04-15T07:33:36+00:002022-04-15T07:33:36+00:00http://srirupa19.github.io/sok/2022/04/15/fourth_post<h2 id="overview">Overview</h2>
<p>This is my fourth blogpost for SoK 2022.</p>
<p>It’s been quite some time since my third blogpost. If you remember, I’ve been working on adding the Perspective Ellipse Assistant Tool in Krita as a part of SoK’22.</p>
<h2 id="my-progress-so-far">My Progress so far</h2>
<h3 id="merge-request-and-status-report">Merge Request and Status Report</h3>
<p>Here’s the <a href="https://invent.kde.org/graphics/krita/-/merge_requests/1343">link</a> to my Merge Request.
Also, feel free to check out my <a href="https://community.kde.org/SoK/2022/StatusReport/Srirupa_Datta">status report</a>.</p>
<h3 id="creating-the-insrcibed-drawable-ellipse">Creating the Insrcibed Drawable Ellipse</h3>
<p>My Perspective Ellipse Assistant Tool looked like this as of March 2022.</p>
<p><img src="/assets/animation2.gif" alt="Animation" /></p>
<p>But the drawable Ellipse is different from the one shown in the animation. Here drawable Ellipse refers to the ellipse in <code class="language-plaintext highlighter-rouge">krita/plugins/assistants/Assistants/Ellipse.cc</code>.</p>
<p>In order to draw the drawable Ellipse, I need to find out the extreme points of the major axis of the ellipse and any other point on that ellipse. Finding out the extreme points of the major axis of the tranaformed ellipse is not a simple task and requires a bit of math, which has been explained in the next section.</p>
<h3 id="a-bit-of-math">A bit of math…</h3>
<p>In order to find the extreme points of the major axis of the transformed ellipse, here’s what we need to do.</p>
<ol>
<li>Obtain the equation of the ellipse by solving the tangent equations using the the four points of the four-point-cage, and the touch points of the cage and the ellipse, which in turn can be found by transforming the touch points of the unit square and inscribed circle.</li>
<li>The general equation of an ellipse contains 6 unknowns, namely <code class="language-plaintext highlighter-rouge">(a, b, c, d , e, f)</code>. Assuming <code class="language-plaintext highlighter-rouge">a</code> can never be zero, I can divide the equation by <code class="language-plaintext highlighter-rouge">a</code>, to get 5 unknowns namely <code class="language-plaintext highlighter-rouge">(b/a, c/a, d/a, e/a, f/a)</code>.</li>
<li>Once I find the 5 coefficients, I can use these to find out the major axis extreme points by the formula shown <a href="https://math.stackexchange.com/questions/616645/determining-the-major-minor-axes-of-an-ellipse-from-general-form">here</a>.</li>
</ol>
<p>Here’s a <a href="https://drive.google.com/file/d/1CtbJcehuN4tO0A9XVX8s2WsOr8J5Kf9-/view?usp=sharing">link</a> that demonstrates the above math vividly. Do check it out!</p>
<p>The <code class="language-plaintext highlighter-rouge">KisAlgebra2d::transformEllipse()</code> helps us to find the major and the minor axis of the transformed ellipse, along with the transformation matrix that we need to apply to the coordinate system. This final transformation is translate + rotate only. However this function works for cases when the circle is centered at the origin. Since our circle is cenetered at <code class="language-plaintext highlighter-rouge">(0.5, 0.5)</code>, we need to take care of this offest before calling the function.</p>
<p>Hence the function call should look something like this.</p>
<div class="language-plaintext highlighter-rouge"><div class="highlight"><pre class="highlight"><code>QPointF newAxes;
QTransform newTransform;
QTransform oldTransform = QTransform::fromTranslate(0.5, 0.5) * m_cachedTransform;
std::tie(newAxes, newTransform) = KisAlgebra2D::transformEllipse(QPointF(0.5, 0.5), oldTransform);
</code></pre></div></div>
<p>I have not yet understood fully what to do with <code class="language-plaintext highlighter-rouge">newTransform</code>, and am still talking to my mentors and clarifying some doubts.</p>
<h2 id="next-steps">Next Steps</h2>
<p>Although the Season of KDE is officially over, I would still be spending a few weeks on this project to complete what’s left. I had a great time working and interacting with the devs, and wish to contribute more to open source whenever I get some time off!</p>Srirupa DattaOverview This is my fourth blogpost for SoK 2022. It’s been quite some time since my third blogpost. If you remember, I’ve been working on adding the Perspective Ellipse Assistant Tool in Krita as a part of SoK’22. My Progress so far Merge Request and Status Report Here’s the link to my Merge Request. Also, feel free to check out my status report. Creating the Insrcibed Drawable Ellipse My Perspective Ellipse Assistant Tool looked like this as of March 2022. But the drawable Ellipse is different from the one shown in the animation. Here drawable Ellipse refers to the ellipse in krita/plugins/assistants/Assistants/Ellipse.cc. In order to draw the drawable Ellipse, I need to find out the extreme points of the major axis of the ellipse and any other point on that ellipse. Finding out the extreme points of the major axis of the tranaformed ellipse is not a simple task and requires a bit of math, which has been explained in the next section. A bit of math… In order to find the extreme points of the major axis of the transformed ellipse, here’s what we need to do. Obtain the equation of the ellipse by solving the tangent equations using the the four points of the four-point-cage, and the touch points of the cage and the ellipse, which in turn can be found by transforming the touch points of the unit square and inscribed circle. The general equation of an ellipse contains 6 unknowns, namely (a, b, c, d , e, f). Assuming a can never be zero, I can divide the equation by a, to get 5 unknowns namely (b/a, c/a, d/a, e/a, f/a). Once I find the 5 coefficients, I can use these to find out the major axis extreme points by the formula shown here. Here’s a link that demonstrates the above math vividly. Do check it out! The KisAlgebra2d::transformEllipse() helps us to find the major and the minor axis of the transformed ellipse, along with the transformation matrix that we need to apply to the coordinate system. This final transformation is translate + rotate only. However this function works for cases when the circle is centered at the origin. Since our circle is cenetered at (0.5, 0.5), we need to take care of this offest before calling the function. Hence the function call should look something like this. QPointF newAxes; QTransform newTransform; QTransform oldTransform = QTransform::fromTranslate(0.5, 0.5) * m_cachedTransform; std::tie(newAxes, newTransform) = KisAlgebra2D::transformEllipse(QPointF(0.5, 0.5), oldTransform); I have not yet understood fully what to do with newTransform, and am still talking to my mentors and clarifying some doubts. Next Steps Although the Season of KDE is officially over, I would still be spending a few weeks on this project to complete what’s left. I had a great time working and interacting with the devs, and wish to contribute more to open source whenever I get some time off!Inscribing the Ellipse: SoK’22 #32022-03-06T07:33:36+00:002022-03-06T07:33:36+00:00http://srirupa19.github.io/sok/2022/03/06/third_post<h2 id="overview">Overview</h2>
<p>This is my third blogpost for SoK 2022.</p>
<p>If you have been following my <a href="https://srirupa19.github.io/sok/2022/02/01/first_post.html">earlier</a> <a href="https://srirupa19.github.io/sok/2022/02/13/second_post.html">blogposts</a>, you would know that I’ve been working on adding the Perspective Ellipse Assistant Tool in Krita.</p>
<h2 id="my-progress-so-far">My Progress so far</h2>
<h4 id="created-a-merge-request">Created a Merge Request</h4>
<p>Here’s the <a href="https://invent.kde.org/graphics/krita/-/merge_requests/1343">link</a> to my Merge Request, you can check if you want to!</p>
<h4 id="creating-the-insrcibed-ellipse">Creating the Insrcibed Ellipse</h4>
<p>Two weeks back this is what my tool looked like.</p>
<p><img src="/assets/prev.png" alt="Tool1" /></p>
<p>Then I spent almost a week scratching my head over the mathematics required to transform a circle inscribed inside a unit square to an ellipse inscribed inside my quadrilateral. Dmitry suggested a nice <a href="https://www.scratchapixel.com/lessons/3d-basic-rendering/perspective-and-orthographic-projection-matrix/building-basic-perspective-projection-matrix">tutorial</a> on projection matrices and geomtery. Going through a few lessons made all the mathematical code less intimidating.</p>
<p>Since I already had a four cornered assistant, all I needed to do was to add it’s inscribed ellipse.</p>
<p>This is roughly what’s done:</p>
<ul>
<li>The transformation matrix is set for the canvas.</li>
<li>A unit square is added to path, which on being drawn on the canvas gets converted to the transformed quadrilateral.</li>
<li>The inscribed circle for the unit square, as expected, gets converted to the inscribed ellipse for our quadrilateral.</li>
</ul>
<h4 id="a-bit-of-code">A bit of code…</h4>
<p>Here’s a little bit of code demonstrating the above procedure. Anyone not familiar with Krita’s codebase can skip directly to the animation!</p>
<p>First, inside the <code class="language-plaintext highlighter-rouge">PerspectiveEllipseAssistant::drawAssistant()</code>, the transformation matrix of the canvas is set using:</p>
<div class="language-plaintext highlighter-rouge"><div class="highlight"><pre class="highlight"><code>gc.setTransform(converter->documentToWidgetTransform());
</code></pre></div></div>
<p>Now, the following code draws a valid four cornered assistant.</p>
<div class="language-plaintext highlighter-rouge"><div class="highlight"><pre class="highlight"><code>QPainterPath path;
for (int y = 0; y <= 1; ++y)
{
QLineF line = QLineF(QPointF(0.0, y), QPointF(1.0, y));
KisAlgebra2D::cropLineToRect(line, gc.window(), false, false);
path.moveTo(line.p1());
path.lineTo(line.p2());
}
for (int x = 0; x <= 1; ++x)
{
QLineF line = QLineF(QPointF(x, 0.0), QPointF(x, 1.0));
KisAlgebra2D::cropLineToRect(line, gc.window(), false, false);
path.moveTo(line.p1());
path.lineTo(line.p2());
}
</code></pre></div></div>
<p>And finally, once I draw the circle inside the unit square, I have my Perspective Ellipse! All I had to do was to add this piece of code:</p>
<div class="language-plaintext highlighter-rouge"><div class="highlight"><pre class="highlight"><code>path.addEllipse(QPointF(0.5, 0.5), 0.5, 0.5);
</code></pre></div></div>
<p>And here’s a small animation demonstrating the current Perspective Ellipse Assistant Tool!</p>
<p><img src="/assets/animation2.gif" alt="Animation" /></p>
<h2 id="next-steps">Next Steps</h2>
<p>I would spend the next few weeks working on drawing and snapping related code. That should hopefully complete my assistant!</p>Srirupa DattaOverview This is my third blogpost for SoK 2022. If you have been following my earlier blogposts, you would know that I’ve been working on adding the Perspective Ellipse Assistant Tool in Krita. My Progress so far Created a Merge Request Here’s the link to my Merge Request, you can check if you want to! Creating the Insrcibed Ellipse Two weeks back this is what my tool looked like. Then I spent almost a week scratching my head over the mathematics required to transform a circle inscribed inside a unit square to an ellipse inscribed inside my quadrilateral. Dmitry suggested a nice tutorial on projection matrices and geomtery. Going through a few lessons made all the mathematical code less intimidating. Since I already had a four cornered assistant, all I needed to do was to add it’s inscribed ellipse. This is roughly what’s done: The transformation matrix is set for the canvas. A unit square is added to path, which on being drawn on the canvas gets converted to the transformed quadrilateral. The inscribed circle for the unit square, as expected, gets converted to the inscribed ellipse for our quadrilateral. A bit of code… Here’s a little bit of code demonstrating the above procedure. Anyone not familiar with Krita’s codebase can skip directly to the animation! First, inside the PerspectiveEllipseAssistant::drawAssistant(), the transformation matrix of the canvas is set using: gc.setTransform(converter->documentToWidgetTransform()); Now, the following code draws a valid four cornered assistant. QPainterPath path; for (int y = 0; y <= 1; ++y) { QLineF line = QLineF(QPointF(0.0, y), QPointF(1.0, y)); KisAlgebra2D::cropLineToRect(line, gc.window(), false, false); path.moveTo(line.p1()); path.lineTo(line.p2()); } for (int x = 0; x <= 1; ++x) { QLineF line = QLineF(QPointF(x, 0.0), QPointF(x, 1.0)); KisAlgebra2D::cropLineToRect(line, gc.window(), false, false); path.moveTo(line.p1()); path.lineTo(line.p2()); } And finally, once I draw the circle inside the unit square, I have my Perspective Ellipse! All I had to do was to add this piece of code: path.addEllipse(QPointF(0.5, 0.5), 0.5, 0.5); And here’s a small animation demonstrating the current Perspective Ellipse Assistant Tool! Next Steps I would spend the next few weeks working on drawing and snapping related code. That should hopefully complete my assistant!Second Blog Post for SoK 20222022-02-13T07:33:36+00:002022-02-13T07:33:36+00:00http://srirupa19.github.io/sok/2022/02/13/second_post<h2 id="perspective-ellipse-assistant-in-krita">Perspective Ellipse Assistant in Krita</h2>
<p>Hello, this is my second blogpost for SoK 2022.</p>
<p>In my previous blogpost, I wrote that I’ll be working on extending the Ellipse Assistant Tool to add support for Perspective Ellipse in Krita. However, last week my mentors and I decided that as of now, it makes more sense to add a new Assistant Tool for Perspective Ellipse instead of extending the Ellipse Assistant Tool.</p>
<h2 id="my-progress-so-far">My Progress so far</h2>
<h3 id="adding-a-new-assistant-tool">Adding a new Assistant Tool</h3>
<p>Here’s the Tools Option Docker after the new Perspective Ellipse Assistant is selected!</p>
<p><img src="/assets/toolbox.png" alt="Tools Option Docker" /></p>
<h3 id="creating-an-adjustable-four-cornered-convex-quadrilateral">Creating an adjustable Four Cornered Convex Quadrilateral</h3>
<p>Anyone familiar with Assistant Tools in Krita would have noticed that the current Perspective Assistant Tool draws an adjustable convex quadrilateral with grid lines. I decided to take advantage of that and reused the existing code, got rid off the grid lines, and voila! I’ve a four cornered mesh for my Perspective Ellipse Assistant.</p>
<p><img src="/assets/difference.png" alt="Difference" /></p>
<p>For people who are familiar with Krita’s codebase:</p>
<p>I added <code class="language-plaintext highlighter-rouge">PerspectiveEllipseAssistant.h</code> and <code class="language-plaintext highlighter-rouge">PerspectiveEllipseAssistant.cc</code> to the <code class="language-plaintext highlighter-rouge">ktita/plugins/assistants/Assistants</code> directory which currently contanis files for all the other assistant tools in the form XAssistant.h/cc, where X is the Assistant name.
Then, I registered my Assistant by including the following piece of code in the assistant_tool.cc file.</p>
<div class="language-plaintext highlighter-rouge"><div class="highlight"><pre class="highlight"><code>KisPaintingAssistantFactoryRegistry::instance()->add(new PerspectiveEllipseAssistantFactory);
</code></pre></div></div>
<p>And there, my four cornered mesh works exactly how it’s expected too! ;)</p>
<p><img src="/assets/animation.gif" alt="Animation" /></p>
<h2 id="next-steps">Next Steps</h2>
<p>I would spend the next few weeks creating an inscribed ellipse inside my four cornered mesh. This, however, is going to take some time as I am not yet fully comfortable with the mathematics involved.</p>
<p>For this part, I want to transform a circle to an ellipse using a transformation matrix, given that the equation for the circle and the transformation matrix is given. I’m looking for a way to obtain the coefficients of the equation for the corresponding transformed ellipse.</p>
<p>Anyone having any leads on this can feel free to mail me <a href="mailto:srirupa.sps@gmail.com">here</a>. Thanks in advance!</p>Srirupa DattaPerspective Ellipse Assistant in Krita Hello, this is my second blogpost for SoK 2022. In my previous blogpost, I wrote that I’ll be working on extending the Ellipse Assistant Tool to add support for Perspective Ellipse in Krita. However, last week my mentors and I decided that as of now, it makes more sense to add a new Assistant Tool for Perspective Ellipse instead of extending the Ellipse Assistant Tool. My Progress so far Adding a new Assistant Tool Here’s the Tools Option Docker after the new Perspective Ellipse Assistant is selected! Creating an adjustable Four Cornered Convex Quadrilateral Anyone familiar with Assistant Tools in Krita would have noticed that the current Perspective Assistant Tool draws an adjustable convex quadrilateral with grid lines. I decided to take advantage of that and reused the existing code, got rid off the grid lines, and voila! I’ve a four cornered mesh for my Perspective Ellipse Assistant. For people who are familiar with Krita’s codebase: I added PerspectiveEllipseAssistant.h and PerspectiveEllipseAssistant.cc to the ktita/plugins/assistants/Assistants directory which currently contanis files for all the other assistant tools in the form XAssistant.h/cc, where X is the Assistant name. Then, I registered my Assistant by including the following piece of code in the assistant_tool.cc file. KisPaintingAssistantFactoryRegistry::instance()->add(new PerspectiveEllipseAssistantFactory); And there, my four cornered mesh works exactly how it’s expected too! ;) Next Steps I would spend the next few weeks creating an inscribed ellipse inside my four cornered mesh. This, however, is going to take some time as I am not yet fully comfortable with the mathematics involved. For this part, I want to transform a circle to an ellipse using a transformation matrix, given that the equation for the circle and the transformation matrix is given. I’m looking for a way to obtain the coefficients of the equation for the corresponding transformed ellipse. Anyone having any leads on this can feel free to mail me here. Thanks in advance!First Blog Post for SoK 2022!2022-02-01T07:33:36+00:002022-02-01T07:33:36+00:00http://srirupa19.github.io/sok/2022/02/01/first_post<p><img src="https://i.postimg.cc/PqdgrknP/starry-night2.png" alt="My Painting" /></p>
<h2 id="about-me">About Me</h2>
<p>I’m Srirupa Datta, a third year undergraduate studying Electrical Engineering at Jadavpur University, India. This year, I have decided to take part in Season of KDE and will be working on extending the Ellipse Assistant Tool to add support for Perspective Ellipse in Krita.</p>
<h2 id="my-introduction-to-qt-and-krita">My Introduction to Qt and Krita</h2>
<p>As a painter who also likes software development, I first came across Krita when I was looking for digital painting applications on Windows. Later on, I learned about open source and decided to start contributing as a way to build my development skills while working on something that I myself use. I spent the last few months of 2020 building Krita, first in Windows (a nightmare :P), then in Linux, and started learning Qt since I was already familiar with some basic C++ from school.</p>
<p>Since then, I have fixed some minor bugs in my free time, including <a href="https://invent.kde.org/graphics/krita/-/merge_requests/801">Warn when exporting layers with multiple transparency masks into .psd</a> and <a href="https://invent.kde.org/graphics/krita/-/merge_requests/894">Convert Colorize Mask to Paint Layer before splitting layers</a>. After becoming somewhat familiar with Krita’s huge codebase, I started looking for something more challenging to implement and came across this <a href="https://bugs.kde.org/show_bug.cgi?id=405643">Feature request: Circle in a Square Assistant Tool</a> .</p>
<p>Once I learnt about Season of KDE, I decided to apply for it and cooked up a <a href="https://season.kde.org/project/88">proposal</a> to implement this feature request and Halla was kind enough to agree to mentor me!</p>
<h2 id="project-details">Project Details</h2>
<h4 id="overview">Overview</h4>
<p>This project aims to create a tool that is essentially an adjustable four corner mesh that always has an ellipse inside it which touches the sides, in order to draw ellipses in perspective with ease.
The attachment below, provided by Hector demonstrates how the tool is supposed to work:</p>
<p><img src="https://bugsfiles.kde.org/attachment.cgi?id=122943" alt="circle in square tool" /></p>
<h4 id="benefit">Benefit</h4>
<p>Developing this tool would make it easier to draw ellipses in perspective. Currently, to draw a circle in a square with the ellipse tool, one needs to draw the diagonals of the square and correctly align the axis of the ellipse to the square, which is rather complicated since it takes time to set a concentric ellipse with the current ellipse tool. With the circle in a square tool, one just needs to set the four corners of the square.
Hector, who created this feature request is also willing to test this feature while it’s being developed!</p>Srirupa DattaAbout Me I’m Srirupa Datta, a third year undergraduate studying Electrical Engineering at Jadavpur University, India. This year, I have decided to take part in Season of KDE and will be working on extending the Ellipse Assistant Tool to add support for Perspective Ellipse in Krita. My Introduction to Qt and Krita As a painter who also likes software development, I first came across Krita when I was looking for digital painting applications on Windows. Later on, I learned about open source and decided to start contributing as a way to build my development skills while working on something that I myself use. I spent the last few months of 2020 building Krita, first in Windows (a nightmare :P), then in Linux, and started learning Qt since I was already familiar with some basic C++ from school. Since then, I have fixed some minor bugs in my free time, including Warn when exporting layers with multiple transparency masks into .psd and Convert Colorize Mask to Paint Layer before splitting layers. After becoming somewhat familiar with Krita’s huge codebase, I started looking for something more challenging to implement and came across this Feature request: Circle in a Square Assistant Tool . Once I learnt about Season of KDE, I decided to apply for it and cooked up a proposal to implement this feature request and Halla was kind enough to agree to mentor me! Project Details Overview This project aims to create a tool that is essentially an adjustable four corner mesh that always has an ellipse inside it which touches the sides, in order to draw ellipses in perspective with ease. The attachment below, provided by Hector demonstrates how the tool is supposed to work: Benefit Developing this tool would make it easier to draw ellipses in perspective. Currently, to draw a circle in a square with the ellipse tool, one needs to draw the diagonals of the square and correctly align the axis of the ellipse to the square, which is rather complicated since it takes time to set a concentric ellipse with the current ellipse tool. With the circle in a square tool, one just needs to set the four corners of the square. Hector, who created this feature request is also willing to test this feature while it’s being developed!